File Upload
BioT supports file and image attributes that allow you to upload files.
When adding or editing a template from BioT console, you can add a file or image attribute.
The attribute allows you to then upload and download the files from the other portal where this entity is visible.
File & Image AttributesBioT file and image attributes are the same, except that BioT will always try to preview a thumbnail of the Image attribute when encountered but, ignore the file attribute. BioT will offer the user a link to download the file or image.
Seehere Postman example for uploading a file.
Sequence:
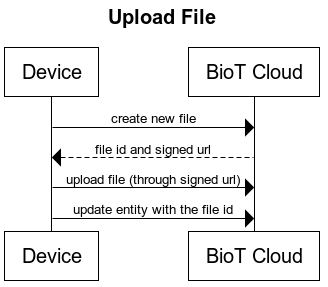
Uploading a file is done in 3 steps:
- Create new file.
- Upload the file.
- Attach the file to an existing entity.
Step 1: Create New File
To get an upload URL call the Create a new File API.
| Parameter | Description | Format |
|---|---|---|
| name | The name of the file. Mandatory. | String |
| mimeType | The mime type of the file. This parameter describes what kind of file you are uploading. Use this list to locate common mime types. Mandatory. | String |
The response will be:
{
  "name": "string",
  "mimeType": "string",
  "id": "3fa85f64-5717-4562-b3fc-2c963f66afa6",
  "signedUrl": "string"
}
Save the ID of the file as you will need it for step 3.
Step 2: Upload the File
To upload the file, use the signed URL you received in the API call from the previous step.
A signed URL is a URL that has a signature in its parameters, which allows you temporary upload rights.
To upload a file, make a PUT call to the URL and pass the file contents as the data of the API call.
For an example, see the following clip, that explains how to upload a file using Postman.
Step 3: Attach the File to an Existing Entity
A file must always be attached to an entity in BioT and cannot be left on it own.
Attaching a file is done by passing the file ID from the first step to the file attribute of the parent entity.
For example, let's say we have a Patient entity that has a file attribute analysis_file.
In this case, we will use the Update Patient API with the following body:
{
  "analysis_file": {
    "id": "<fileId>"
  }
}
The file will be attached to the entity and will then be accessible from the portals and via API when using the Get Patient by ID API.
File Deletion
- Detach and Delete: To delete a file attached to an entity, modify the entity and set the file’s ID to "null". This action removes the file from the entity.
- Replace and Delete: To replace the existing file with a new one, update the entity with the new file ID. This will delete the previous file and associate the new one with the entity.
- Entity Deletion: If you delete the entity entirely, any files associated with it will also be deleted automatically.
Note: Files not attached to any entity will not be deleted.
Updated 10 months ago