Sending Measurements via MQTT

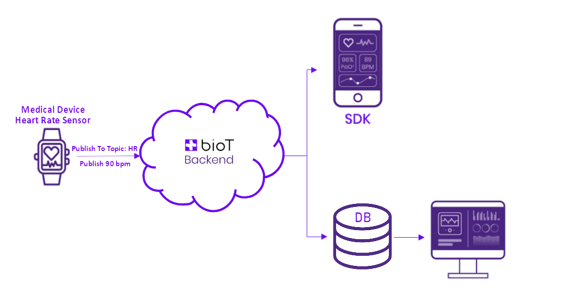
In this article we will go over how to send individual measurements via MQTT protocol.
If you have many measurements to send in high frequency or if you prefer to send messages in bulk, please read more about how to send measurements in waveform.
To send a measurement or the current device status, you first need to obtain the appropriate topics from the “environmentData” named shadow.
NoteThe
clientIdin the following topics is configured in the device during the activation stage. See Direct Device Connection
Register to the following topic:
$aws/things/<clientId>/shadow/name/environmentData/get/accepted
Then publish an empty JSON message to the following topic:
$aws/things/<clientId>/shadow/name/environmentData/get
You will receive the current “environmentData” shadow content, for example:
{
   "state":{
      "desired":{
         "topics":{
            "MEASUREMENT":{
               "publish":"<clientId>/from-device/measurement"
            },
            "STATUS":{
               "subscribe":"<clientId>/to-device/status",
               "publish":"<clientId>/from-device/status"
            }
         }
      },
      "delta":{
         "topics":{
            "MEASUREMENT":{
               "publish":"<clientId>/from-device/measurement"
            },
            "STATUS":{
               "subscribe":"<clientId>/to-device/status",
               "publish":"<clientId>/from-device/status"
            }
         }
      }
   }
}- Read the “MEASUREMENT.publish” value from the received JSON and use it as the topic to publish the measurement to.
- Read the “STATUS.publish” value from the received JSON and use it as the topic to publish the statuses to.
- Read the “STATUS.subscribe” value from the received JSON and subscribe to it to get status update requests from BioT.
Sending measurements
Use the following JSON format to send a measurement:
{
   "metadata":{
      "timestamp":1641985478161,
      "context":"ewogICJwYXRpZW50SWQiOiAiZDU3MzhkZjYtMGRlZS00YTY1LTk0MzktODg5ZTE3YTM2MjM3IiwKICAic2Vzc2lvbklkIjogIjBhYWVjYTRmLTMxOGUtNDg5MS1hOWY1LWY3YTBiNzkyMjVkNCIsCiAgIm93bmVyT3JnYW5pemF0aW9uSWQiOiAiYWUwNmI1MWYtOTEyOS00NDg3LThiODgtN2MwNWIwMDcxMmRhIgp9"
   },
   "data":{
      "hr":"97",
      "spo2":"92"
   }
}
Parameter | Description | Format |
|---|---|---|
timestamp | Event time, in milliseconds, in UTC. | Epochtime in milliseconds |
context | A unique string representing the session. You receive this context in the response of create session API --> _sessionContext attribute. | String |
data | Biomarkers with values (key-value JSON). |
Sending historical measurementsIn some cases historical measurements shall be uploaded by the device. Historical measurements are defined as measurements that their timestamp is older than 1 day from the current timestamp This can happen, for example, when the device that was offline for a while, uploads it's locally save measurement to the cloud.
In this case it will take up to 6 hours for the data to be added to the database and be searchable from the historical view.
If you need to send measurements older then a single day that need to be logged in immediately, please contact us and we will update the platform to fit your exact needs.
Updated 5 months ago
